A Simple Guide To Google Merchant Center
Jack D'Errico
Jack D'Errico

What is Google Merchant Center?
Google Merchant Center is the first step to building your Google shopping ad Campaigns. It is a platform comprising all the details required to manage your brand/store’s online presence. The merchant center dashboard allows the retailer to list all the products and tailor the market results by changing the settings as needed.
The online dashboard of the Google Merchant Center is user-friendly and explicitly designed to easily maintain product information, including pictures and pricing so that your products display on the top page of google search results. The GMC complies with other Google services such as Google My Business, where the merchant can view robust insights and can take over the Google-based advertising and marketing completely.
Role of the Google Merchant Center
- The GMC dashboard primarily informs the availability of the product for sale. The tabulated language used in GMC is in congruence with the Internet.
- It provides Google the necessary information to create an ad campaign for your listed product.
- It notifies Google about your potential customers by allowing you to share additional information. The detailed information provided enables Google to target customers who are the best fit for your product.
- It allows the retailer to control the screen presence of the product and deliver the required information to reach the customers across Google.
Where is your Google Merchant Center Data used for?
Google Merchant Center Data is used in three primary fields – Google Shopping Ads, Local inventory ads, and Google Shopping Actions. Let us zoom into each field briefly.
Google Shopping Ads
These are the ads that include high-quality product information, images, pricing details, brand details, seller name, and enticing short product descriptions.
Google Shopping Ads are created using data attributes saved in the product information submitted in the Google Merchant Center.
Google Merchant Center further aids Google to target your newly created Google Shopping Ads to your potential customers.
Local inventory ads
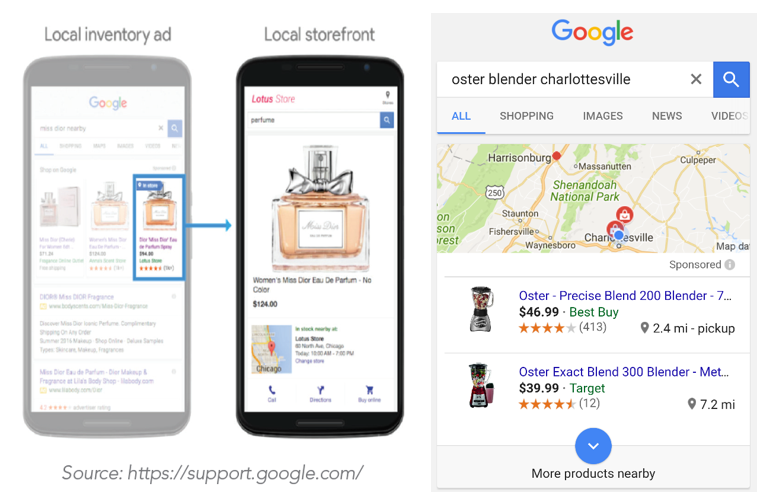
The Local Inventory Ads feature your offline store information and products to local customers while surfing on Google. These ads include information such as store location, local product deals, pricing, ratings, and reviews. When shoppers click on these ads, it directs to your local product page hosted by Google, also called Google Storefront.
These local inventory ads function based on the data fed by Google Merchant Center. The GMC has an additional column of information to be filled to aid the local inventory ads.
Google Shopping Actions
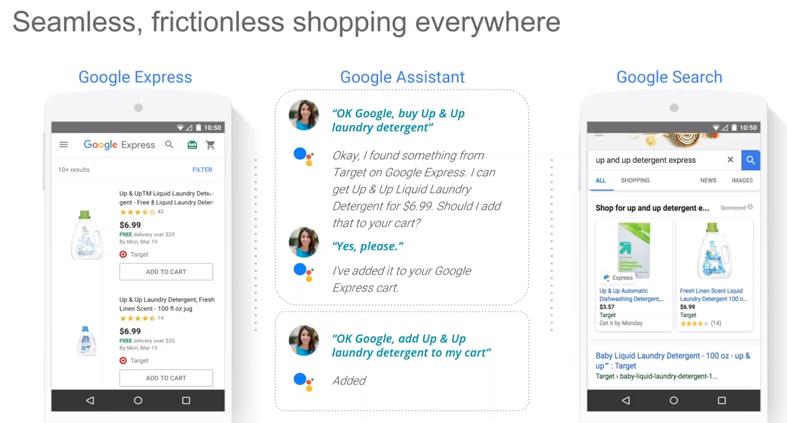
Google shopping actions are a unique feature that allows you to market your Google Shopping Ads on multiple Google platforms like the Google search results, the Google Shopping mobile app, the Google Home devices, and the Google Assistant. More the merrier, right?
With multiple shopping surfaces being added, Google Shopping Ads are aided by the data feed to Google Merchant Center. The GMC accounts for multiple columns to store the data required to facilitate the multifunctional Google Shopping Actions.
How to Create a Google Merchant center account?
To initiate your Google Shopping Campaign process, you need to create an account in Google Merchant Center. To achieve this, you need to be equipped with certain simple sources like a Gmail account (the mail address with a password), detailed business information (Google Merchant Center allows you to create an account only if it finds your business genuine and credible), and finally you need to have enough product data which will be submitted to the future GMC account in the required format.
Let’s learn and follow the step by step instructions to create a Google Merchant Center Account.
Head to the Google Merchant Center and sign in with your existing google email address and password to get started. Input your business information like business name, business address, and tax settings.
Step 1: Feed your business information
Let the GMC configure your business existence to its best, by inputting the required data only once, no recurring inputs are required in this section. The business information provided will be used across the online dashboard, Google Merchant Center for all your Google Shopping Ad Campaigns.
Add your business location, select the country your business is based in, the time zone gets automatically selected based on the country chosen. In case your business moves to another country, you can change the time zone in account settings at any point in time.
Enter your business name, it could be your company’s name, website name, or store name. Please note that your business name will be registered as your merchant center name, which will also be displayed across all your Google Ads.
Also, Changing the time-zone later in the account settings will not alter the data entered while creating the Google Merchant center account. It does modify the analytics and performance metrics of your campaign and products.
Step 2: Choose where you want your customers to check out.
Google Merchant Center enables you to select the checkout options according to your business preferences. Your checkout preference can be changed later as well.
GMC provides 3 checkout options
1) Website: Whenever your customers click on the free listing or Google Shopping Ads, they are directed to your shopping website to complete the purchase process.
2) Google: when your customers click on your shopping ads on Google, they can directly buy the product on Google without leaving the page. Also, customers have the option of viewing and purchasing the product from your official website.
3) Local Store: Here customers view your local inventory ads, but to buy your products, customers need to visit your store, check the product, and bill the items.
Step 3: Choose your management platforms
Link your Google Merchant Center account with third-party platforms. This enables the GMC to configure the tools you work with and the platforms your business is associated with.
Linking this information helps the merchant center to simplify the setup process and provide better services. Also, you can add any number of tools at any point in time post the GMC account creation.
Step 4: Choose your email preferences
Google Merchant Center sends you updates, tips, best practices and invites to test their new features. Therefore, provide a legitimate email address to receive all such interesting information. You can also choose to withdraw your name from the email list at any point in time.
Step 5: Verify and claim your website URL
Google Merchant Center permits you to use all the programs only if the website URL is claimed and verified. This verification process lets the GMC note that you are an authorized owner of the registered business. Claiming affiliates the verified website URL with your Google Merchant Center account.
If you have not verified and claimed your website URL already, you can do so by choosing one of the four ways. This allows Google to communicate with your website by adding markers to your site, making it easier for Google to locate your site and products.
These methods also confirm that you are the authorized owner of both your merchant center and website. Completing the verification process ensures that the authorized owner of the website can edit and access the website through Google Merchant Center. This code does not give Google any other sort of access or permissions.
To wind up the verification process, Claim your site and reserve the verified URL to use with your Merchant Center account. Also, remember that only verified website URLs can be claimed.
Please note that the links provided in your product data match the URL of your website including the domain used like .com, .in, .net, etc. In case you have purchased a ‘.com’ domain for your website URL, entering the ‘.net’ domain in the product data will result in failed registration and your merchant center account will not process successfully.
- To verify your website URL,
- Type your website URL
- Also, you can verify your site URL at any point in time using the steps given below.
- Log in to your Google Merchant Center account.
- In the navigation bar, click on the ‘tools’ icon.
- Click the website tab and enter your website URL of your online/offline store. Make sure the link address starts with HTTP:// or HTTPS:// and matches the domain that you use and maintain.
- Click ‘Save’
However, you can also access this page by clicking on ‘Provide your website URL’ in the setup pages. You can opt for this alternative method to surface all your shopping ads on Google.
If you have already verified your website URL with other Google platforms or products like Search Console, there is no need to repeat the verification process for Google Merchant Center. You can skip the verification for GMC and directly jump to the claiming process.
Step 6: Claim your website URL
Aforesaid, you can exclusively obtain the right to use your website in terms of Google Merchant Center by claiming the website URL post verification. Complete the verification and claiming process by clicking on the blue CLAIM URL tab in the bottom right of the page.
Once the claiming process is done, you are required to create a product feed. If you use the content API, to recrawl the feed you will have to re-upload your feed.
Step 7: Upload your Product data
You will be required to create a product feed, to deliver your product details in Google Merchant Center. Creating and registering your first product feed is vital to further create any extra feeds. After creating your first feed, you can edit, reupload your present feed and add more recent feeds at any time. You do not need registration, every time you create a new product feed.
The supported file type required to be submitted is in the .txt or .xml format.
There are two main feeds to be submitted in the Google Merchant Center: Primary feed and Supplementary feed.
1) Primary feeds
This google shopping feed holds the basic information of the product that needs to be displayed under your products while surfacing on Google. The feed requires certain product specifications to be met.
If you already have your primary data in congruence with the specification, your only job is to create the primary feed. Suppose your product feed does not match the GMC specification, you can make the required edits in the advanced settings feed and supplemental feed.
In addition to this, you can create a rich product feed with customized themes and other options to increase the execution of your free product listings and shopping ads in the supplemental feed.
In your primary feed, you can set your languages and targeted countries, add or delete product data, tailor your feed regulations for your items, and more. This is a single feed where you have the liberty to put in or discard the products from the listing.
If you plan to create different primary feeds for both Google Shopping ads and Google local inventory ads, make sure to add unique products in each of the feeds created. Do not submit the same merchandise details in both the feeds.
However, Google suggests listing all the items in the same feed, to be able to access all the GMC features. While creating new feeds, you can choose the feed destination.
And if you already maintain an existing feed, but wish to create a different destination like local inventory ads or product ratings feed to your newly created feed, you can do the required edits in the primary-feed settings. To omit products from existing destinations, you need to employ the excluded_destination attribute.
2) Supplemental feeds
This is an additional data feed that is attached to the current primary feed data. Unlike primary feeds, you cannot put in or delete products from the supplemental feed. All the required edits (addition/omission) needs to be executed in the primary feed itself, which will then be reflected on the supplemental feed as well.
This feed is meant to enhance your existing data and achieve a tailored presence when surfaced on Google. It is not a standardized feed but provides extra data to many primary feeds so that you can design your ads better.
Use the id attribute to connect the supplemental feed to the established primary feed. It is very important to enter the product data that already exists in your primary feed. New product ids absent in the primary feed will not be processed in the supplemental feed due to case-sensitivity issues.
To create a separate feed for pricing and availability updates, create a supplemental feed and use the “Take latest” attribute to revamp your primary feed likewise.
To submit the product information to your Merchant Center:
Refer to the instructions and protocols provided in the Merchant Center and follow the guidelines accordingly, recognize the product category your items fall in.
- Log in / Create your account.
- Click “Shop” from the Top Menu.
- Find the product that you need to add or update and click the “Edit Product” icon after it.
- Click “Product Identifiers” from the top listed tabs.
- Fill in the required fields like GTIN, UPC, EAN, JAN, ISBN, MPN, and Brand.
Once you have set up your products to connect with your Merchant Center, your download feed is all set to use.
To download your feed, kindly comply with the steps given below:
- Sign in /Create your account.
- Click “Shop” from the menu at the top.
- Click “Product Promotion” on the left-side menu.
- Click “Google Merchant Center” from the tabs on the top.
- Click on the “Download” button to download your product feed for GMC and manually upload it.
Once you have saved your feed from your Create account onto your pc by following the steps above, you will be able to submit the product data to your Merchant Center account.
To do this, please comply with the steps below:
- Sign in to your Google Merchant account here: http://www.google.com/merchants
- Click “Data feeds” from the left-hand menu.
If you have not set up a feed yet, you will need to register a new one. You’ll see a button to register “New Data Feed”. Here you will want to add some records to set up your feed:
- Choose your “Target Country” from the drop-down menu.
- Choose “Google base” as the “Format”.
- Set your “Data feed filename” to “googleBase_productFeed.txt”
- Click on the “Save Changes” button.
- In the Uploads column, click the “upload file” link.
- In the pop-up window, click on the “Browse…” button.
- Navigate to the folder on your laptop where your feed is. Select the file you’ve downloaded from your Create account and click on Open. (Please confirm if your file is a “.txt” before uploading).
- The selected file will show up in the area to the left of the “Browse…” button. The filenames must match, so it is important to test this now.
- After you have demonstrated that your filenames match, click on “Upload and system this file”.
Please note: The upload may take quite a few minutes, depending on the size of your file and the speed of your Internet connection.
Once your file has been uploaded, you may see notifications on your display screen if the ad was a success. Now your Google Merchant center is ready!
To Conclude
Creating an account in Google Merchant Center is easy and convenient. With retailers jumping off the roof and marketing their products and services online, Google Shopping Ads has played a vital role in backing the international and local marketing strategies effectively.
Therefore it’s high time you create your merchant center account and list all your products to reach more potential customers.
Guest Post Contribution from AdNabu
AdNabu helps improve sales in Google Ads for shopify stores. If you are running the google search, google shopping, or display campaigns in Google Ads, Their apps help to increase your sales.
Leave a Comment